")
Login
When you first access Jeffrey AI, you will first face this screen. From here you have the option to do one of the following:
- Create a new account
- Login in with a previously account
- Reset their password.
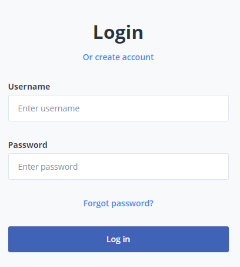
To login, you can type in your Username and password in their respective boxes and select “Log in” to enter Jeffrey AI.
On some occasions you may be required to complete 2-step verification. A text with a 6-digit code will be sent to the phone associated to your account. Type your code into the text box and press continue to enter Jeffrey AI.
Log in – Creating an Account

If you chose to create an account, you will be redirected to this stage 1 to begin filling out your details. The bar at the top of the screen will highlight your progress through the creation process/
All mandatory fields must be filled in to be able to select ‘Next’. Fields that are optional are labelled throughout the sequence.
Your password must meet all the following criteria to validate:
- At least 8 characters long
- Include at least one letter, number and symbol
- At least one uppercase and lowercase letter
For each stage, once the mandatory fields are completed, the ‘Next’ button will change colour from grey to blue and you’ll be able to continue.


At stage 2, you’ll be asked to fill out your phone number. This will be required for 2-step verification, but you can also choose to skip this step.

At stage 3, you will be required to fill in your company details. If you’re company already has a Jeffrey AI work space, the company will appear in the drop down menu. Selecting a company from this list will automatically fill in the industry and company details.


If your company does not yet have a Jeffrey AI work space, you can fill out the Company name and details manually. You can select the industry from the drop down menu. Creating a new company like this will then become an option on the drop down menu for any additional accounts for this Jeffrey AI work space.


At stage 4, you will be asked to fill out further company details. If you created a new company, you will be required to fill out the mandatory fields.

If you selected a pre-existing company from the menu in stage 3 will you will skip this stage and move onto stage 5.
At stage 5 you will be given the option to invite additional users to the work space by sending them an email invitation. This is detailed in the next section of the user guide.

Stage 6 is the final stage, you will be notified that a verification email has been sent to the address you chose. You will have the option to resend the verification email or return to the login screen.

Click the link on the email to verify your account. Depending on how your Jeffrey AI settings are set, the administrator may need to approve your account once you’ve clicked the verification link before you can log on.

Once all these steps have been completed, you will be able to log on to Jeffrey AI.
Login – Inviting new members
When you’re creating your account, at stage 5 you have the option to invite additional users to the same work space immediately to save time in the account creating process.
To do so, type in the email address(es) of the users you wish to add, clicking the “+” button after each email has been typed.
You can still create a new account and be added to the company work space as shown in the previous stage if you are not invited by another user.

Once you have typed out all the emails you wish to add, select “Confirm” to send them email invitations. The invited users should receive an invitation email that looks like the example below:

To begin creating a new account, you will need to click the link within the email to go to the account creating process.
After clicking the link, you will be directed to the page below and asked to confirm your company. The company will be the one set by the user who invited you.

If the company details are correct, select “confirm” to progress. You will receive the following message to confirm your account has been created. Select “Sign up” to continue the process.

At the next stage, you will be asked to fill out the first 2 stages as if you were creating an account from scratch. Once these are complete, the screen below will appear confirming your registration. You will be able to log into Jeffrey AI immediately pending admin approval.

Changing your Password
If you have forgotten or wish to change your password, select “Reset Password”. You will be taken to this screen.

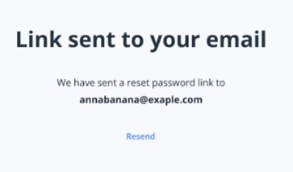
Type your email and press “Send” to receive an email, the screen will change to confirm the email you’ve sent to.
Once you receive the email, click the reset link to change your password. You will be required to confirm your new password. Your password will still be required to match the criteria detailed when creating an account.

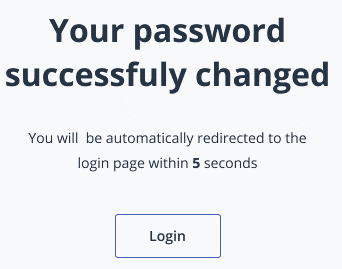
Once your password is confirmed you will see a confirmation screen that your password has successfully been changed. You can choose manually to return to the home screen or be redirected automatically.