")
The contacts page allows you to few all your contacts that relate to your business. In the table you will be able to see key information relating to that contact, including their email, phone number, organisation they’re linked to and best contact time.

Creating Contacts
In the top right-hand corner, you will see three buttons: Import, Export and Create Contact

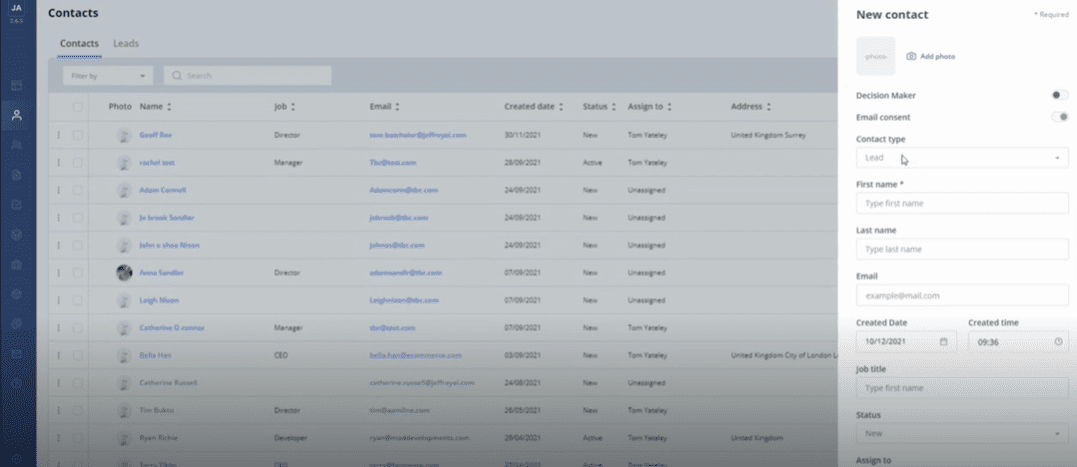
If you select “Create Contact” a side-column will open on your screen to the right hand side. From here you will be able to fill in the details for a new contact.
Mandatory fields are marked with an asterisks, and some fields are dropdown choices. In some fields, such as email and mobile, it will indicate to you if there is an error.

If you wish to add “Best Contact Time”, you will be given a table with several options to choose from. By default, the options are given for every hour of the day.

When you click on the organisation field, you will initially receive a dropdown menu, but you can also begin typing the organisation to find what you’re looking for.

You also have the option to link contacts to social media accounts by pasting their links into the respective fields.
Once you have filled in all the fields needed, scroll down to the bottom of the column to create your contact. The create button will change colour from grey to blue when all mandatory fields are completed correctly.
You can also choose to add custom fields to the contact or cancel creating the contact by selecting their respective buttons. Once you’ve finished creating a contact you will revert to the contacts page.

Importing & Exporting Contacts
You also have the option to import a larger amount of contacts at once by pressing the “Import” button. If you do so, a text box will appear in the middle of your screen.

Jeffrey AI currently accepts csv and xml files up to 5mb to import contacts. Press “Upload” to select a file from your computer. Once this is selected the “Confirm” button will change colour from grey to blue.
Contact Details
Double clicking on a contacts name will take you to their contact details page. On this page you will be able to see all their contact information, track activities and statistic involving them, and communicate with the contact.

The left-hand column details contact information, the organisation they’re linked to, and deal progress. You can also select to contact them or create a note or task by selecting the buttons underneath the profile picture.
For more details about creating a note or task, please see “Adding tasks and activities to a contact or organisation” in the General features section of this user guide.
You can edit information in the left-hand column by clicking the field you wish to edit. This will create a typing prompt for you to edit. A pencil icon will appear on the right side of the field to confirm it is being edited.

At the bottom of the column you will have the option to delete the contact. Clicking on this button will open a text box to confirm your actions.
Some fields, such as phone, mobile and email, will display an error message if the format of the edited information is incorrect.

Clicking on Organisation will display a drop down menu of organisations already created within your work space.

To enter a new organisation, you will have to create one. Please see the “Organisations” section of this user guide for more information.
You can delete a contact from the details page by scrolling down to the bottom of the column and selecting the “Delete contact” button. A text box will appear asking you to confirm your actions before you delete the contact.

The statistics table breaks down your communications with the contact, including emails sent, how much the AI has replied to them, calls, and meetings.
You can see what groups and engagements the contact has been linked to in the box in the top right corner of the screen. If there are multiple groups or engagements, you can press “See All” to see a full list. You can also click on any group or engagement to take you directly to their detail’s pages.
The table at the bottom allows you to track activities and see the workflow linked to the contact. By default, you will see the activities when you first load the page.
The activities history will show what action was performed, when it was performed and display any description attached to it. You can also choose to filter different actions in the top right corner. Activities will display with the most recent at the top; scrolling down will take you to earlier activities.

- Flow
Table view
In table view there are several actions you can perform with one or multiple contacts at once, including adding contacts to groups and engagements, or deleting contacts from your workspace.
To perform an action to multiple contacts at once, first select the contacts by clicking the tick box to the left of their respective lines.

Once you have ticked every contact you want, you can choose the action you wish to perform. In the bottom left of the screen you will see how many contacts are selected, the Delete button and the Export Button.

If you wish to delete the contacts, select the delete button, you will be asked to confirm your actions before the contacts are deleted.

Select the Export button to export your contact(s) details into a csv or xml file. You will be given the choice of which type of file before the data is exported.

After you’ve selected the file type, your browser should begin downloading the file.
In the bottom right corner, you will have the option to add a contact to a group or engagement.

To do so, select either group or engagement and then select the drop-down menu. You will be given the options to choose a group/engagement from the list, search for a specific one, or create a brand new one. Selecting an existing group will cause it to appear in the original text box and close the pop-up.

If you select to create a new group/engagement, a new text box will appear asking you to type the name of the group and the option to add the highlighted contacts to the group immediately. Once this is complete, the new group or engagement will display in the original text box.
Once your selection is complete press “Add” to confirm your actions and your contacts will be added to the group/engagement.

Pipeline View: Contacts
In contacts pipeline view you will see progress of contacts through deals and the engagement their involved in.
As discussed earlier in this User guide, you can view your contacts in a pipeline as well as a table by selecting the pipeline button at the top right of the table. The button is represented by 3 vertical lines of different lengths.

In contacts, the pipeline displays as below.

Some options such as Import, Export and create contact are still available to you. You can also still click on a contacts name to be taken to their details page. Other features such as adding to groups and engagements and deleting contacts will not be displayed.
The pipelines are set into 4 columns based on status: New, Active, Completed and Closed. Contacts will appear in columns based on the progress of engagements involving them. At the top of each pipeline you will be able to see the number of contacts at that stage and the total potential deal value.
Contacts will move across from left to right as the status of the engagement changes from new to closed.

Contacts by default have their name, ID and number of engagements linked to them displayed. Clicking on the arrow next to the number of engagements will provide you with a drop down list of all the engagements. Clicking on an engagement will take you to the engagement details page.

Because a contact could be involved with multiple engagements at different stages, it is possible for a contact to appear in multiple stages within the pipeline at the same time. What will differ however is the engagement list.
For example, selecting a contact under “new” will list all the new engagements linked to the contact. However, the contact may also appear in “Active” with a different list of engagements which have progressed to that stage.